In this article, I wrote about why we can apples. I have had some friends ask me which recipes we use and how we do it. I am a self-taught canner. I am not an expert. I am just a modern mom who is trying to connect with old-fashioned good sense. That said, I will gladly share what we do in the hopes that it will help others.
First, I consider the Ball Blue Book as the gold standard in canning safety. Over time, we have learned where we could trust other recipes. For newbies, however, I want to stress the importance of getting and working your way through the Ball Blue Book.
Second, we have a glass top stove. In traditional canning, this is a big no-no. There are some well founded concerns about the unevenness of heating on glass stoves and this can cause a bad seal in your canned goods. To be safe, we use a propane burner in the garage or on our patio, with our canning kettle.
Third, having the right materials really is a big deal. If you plan to can acidic things like tomatoes, you have to have plastic tools like these. You just do. Something about the acidic reaction to the metal… I don’t know specifically what the reaction is, I am not a food chemistry guru, but I trust the people who know these things.
Now, the recipes and our technique:
Applesauce
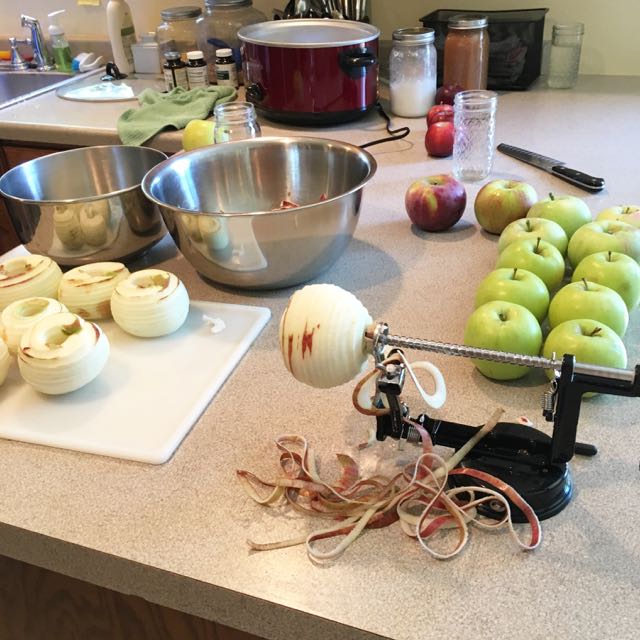
Applesauce is one of the easiest things to can, except for the hours and hours of labor involved in getting to the canning stage. Using this recipe as our guide, we understood that applesauce is very simple: somewhere in the process you need to remove cores and skins, you need to season, and you may need to add honey or sugar. If you get your blend of apples right, you may not need any sweetener at all. Which order you do things in is entirely dependent on the tools you have. For purposes of this article, I am going to focus on the most inexpensive tools that beginners may be more apt to have on hand already.
- After picking my apples in a ratio of about 50% Cortland and 50% a blend of sweeter apples, I used my fun tool to core, peel and slice them. After that, all I had to do was chop them into smaller pieces so that they would break down faster in my pot.
- I added about an inch of water to my dutch oven and filled it with apples. About 25 apples fit in the pot I use. I didn’t worry about waiting for all of them to be cored and peeled before starting the heat. I got a batch going and kept adding to it.
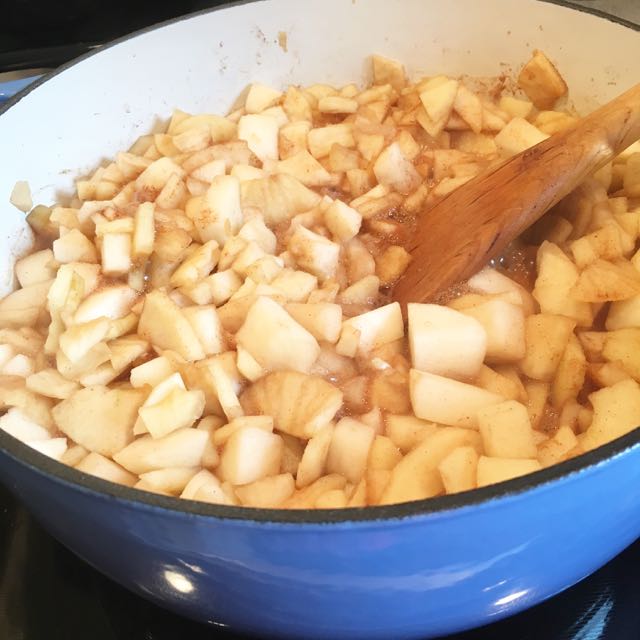
- I brought everything to a boil, then reduced the heat to a simmer to let the apples break down for about an hour.
- After an hour, all I needed to help the apples into a mashed state was my potato masher.
- After the apples were broken down to my preferred texture, I put them through a strainer to strain off the excess water. (Save the cooking water. There are other uses for it.) This step is time consuming and not absolutely necessary. I think it is worth it.
- Because I want to can in big batches, but my apples cannot get cold while they wait for the canning bath, I transferred this batch to my Nesco which was set to about 150 or 200 degrees to hold the apples. If you don’t have a Nesco, a crock pot will work on “warm,” as will a pot on the back of your stove. The apples don’t have to be kept at a certain temperature, but they do have to be kept warm to prevent any bacterial growth.
- In the Nesco, I stirred in a couple of tablespoons of honey and a heaping tablespoon of cinnamon.
- I repeated the above process for as many batches as my Nesco could hold (it holds three, plus I can another batch from the stove).
- To process, I followed the canning instructions in this recipe exactly.
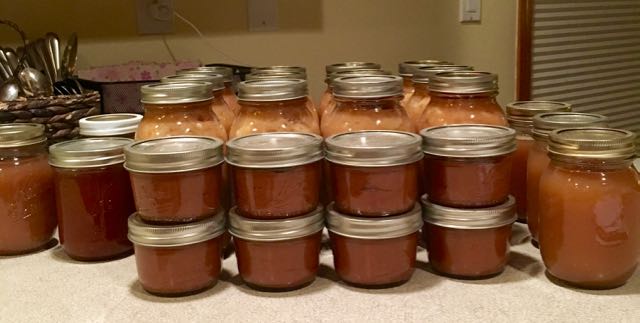
Now the discouraging reality: all of that work – 4 batches of about 25 apples each – rendered a mere 12 quarts of applesauce. Tiny Jars.
Applebutter
Doubling this recipe, I learned that apple butter is best when it is cooked very slowly over low heat all day long.
- After picking my 24 apples in a ratio of about 50% Cortland and 50% a blend of sweeter apples, I used my fun tool to core, peel and slice them. After that, all I had to do was chop them into smaller pieces so that they would break down faster in my pot.
- In my crockpot, I combined my apples with 1 cup of water, ½ cup of brown sugar, ½ cup of local honey and 2 heaping tablespoons of cinnamon (I omitted the nutmeg because I don’t like it).
- I set my crockpot to warm and let it work for at least 8 hours.
- After about 8 hours, I used an immersion blender to puree the apples. If you do not have an immersion blender, a regular blender or baby food mill will also work.
- Depending on how much time I have, how sweet I want the apple butter to be, and how moist the apple butter is, I may take it from this step straight to canning, or I might let it work a little longer in the crock pot. Really, it is all about preference here.
- To process, I followed the canning instructions in this recipe exactly.
One Comment
Comments are closed.